#DevPolHack

Time to do some prototyping.
Here are few things to keep in mind:

This will be the point where the mentors play an important role. Make sure to brief them and remind them of the time to connect and how they can serve the groups best.

Out of the hundreds of ideas, teams will now move into prototyping and trying out stuff. Mentors will support this process, and if you are asked to join and answer few questions, please do so. Now is the time to help the ideas become more feasible, clear and detailed.

Now that you have your selected idea, let’s get into the details of developing, prototyping, testing and fine-tunning it! In this chapter, you will go through a process of 2 hours dedicated solely to prototyping. The prototyping phase will be supported by mentors who will help you move forward in the process.

a. Intro game to prototyping

Games you can use for this step

01. Sketch Your Neighbour

Games you can use for this step


Tools: Laptop, paper, pen

Objective: Get everyone acquainted by having your team attempt to draw each other; get everyone accustomed to imperfection (prototyping will also be imperfect) 🙂 

  • You can do the exercises using pen and paper, and then share your drawings by showing them on the webcam. The facilitator should make sure everyone has a pen and paper ahead of the session. 
  • Assign each team member with another person’s name and send them a direct message to let them know — it’s important to send it privately so the others can’t see the names. 
  • Give everyone 1 minute to silently draw the person they identified in the mural (tip: play music during the silent moment in the background and make sure the sound can be heard by the participants through your microphone). 
  • When everyone has finished drawing, take turns guessing who drew who. 
02. Rapid Prototyping Energizer (for in-person events only)

Step 1 — Collect whatever strange or mundane items you find sitting on your room or hidden in your bags: paper clips, plastic bags, chargers, ear plugs, yogurt lids, cardboard packaging, you get the idea…  

Step 2 — (If you are doing this activity in a group, do this part individually.) Set a timer for 5 minutes. This is important! The time pressure will motivate you. Before the timer goes off, write as many things that you could make with the things in your junk pile. Self-watering flower pot? Great! Amusement park ride for a cockroach? Awesome! At this point, reserve judgement. The goal here is quantity, not quality.

Step 3 — (If you are doing this activity in a group, do this part together. ) Set a timer for 10 minutes. Write all of your ideas on sticky notes and arrange them in clusters. Based on the similarities, see if you come up with any new ideas. Are there ways to combine some of the ideas, or extend them? Together, choose one that you want to prototype and figure out who this object will be for and what purpose will it serve.

Step 4 — (If you are doing this activity in a group, do this part together.) Set a timer for 15 minutes. Here’s the part where you actually build a functional (albeit low-efoort) prototype of your idea. Yes, some things won’t work fully, but that’s the fun part — how can you get as close as possible with the limited materials you have? Make sure to test out your prototype by wearing it, using it, acting out some of its functions, etc.

For online #DevPolHack:

Use the same game but ask participants to do the work individually and build something from things they have laying around. In Step 3, ask participants to make a decision on what to build on their own, and to spice up the challenge, ask them to build something they will have to post as their profile image on social media (for example) or something they will have to show to their family members after the online event 😊 In the online setting, allow for some extra time so every participant can present what they built.

For other game ideas for this stage check:

Maira Rahme’s Workshop and Meeting energizers:
https://miro.com/miroverse/workshop-and-meeting-energizers/

“I went to the beach and took” -
https://www.funretrospectives.com/went-to-the-beach-and/

b. 3 steps of prototyping

Now that you have your selected idea, let’s get into the details of developing, prototyping, testing and fine-tuning it! In this chapter, you will go through a process of 2 hours dedicated solely to prototyping. The prototyping phase will be supported by mentors who you’ve chosen as experts in the challenge selected. They will serve as source of inspiration for further developing your idea. 

The Prototyping Stage follows the Ideation Stage in the process. Before we get into the details of this stage, you must be curious about what ‘prototype’ and ‘prototyping’ mean. Allow us to explain. Prototypes are physical representations of ideas or concepts, and prototyping is the act of creating those objects.  The type of prototyping that we’re looking to engage in can be described as rapid. The goal of rapid prototyping is to build something rough and unrefined so that your idea can come to life as quickly and cheaply as possible. The intention is that, instead of trying to create something perfect on the first try, a messy first draft can lead to an excellent second or third draft sooner. A wide variety of tools can help with rapid prototyping. Storyboarding, making a model, acting things out, providing flash feedback and applying a concept tool are all ways that prototyping happens. The following pages tell you how to utilize each of these tools.  

Overall, the Prototyping Stage is important because it fosters shared understanding among your team. It also makes space for feedback, which is critical to improving your concept. Shared understanding and feedback space can, in turn, accelerate progress by helping you to get rid of ideas that wouldn’t work down the line. 

In DevPolHack, we have designed a selection of three simple steps that lead a group through prototyping. However, there is many more steps and tools that can be used. If you are curious to know more, please check out one of the following exercises as additional “homework”: 

Other tools you could use:

Storyboard

A storyboard is a simple and powerful tool for modelling a persona’s experience of your chosen solution idea, much like a comic strip can tell a vivid story. It is a scene-by-scene depiction of the key moments of a scenario, ideally capturing details in both visual and textual format.

Make a model

Making a model is about creating something physical that represents an important solution the participants want to learn more about and test. It could be a model of a poignant aspect of the experience you are prototyping or the journey as a whole. The simple act of making something physical helps the team to decide rapidly on many details of the concept.

Act it out

Acting it out harnesses our words and actions to tell a story. It may also include aids like props and costumes and can have single or multiple ‘acts’ that depict one or more scenes. Acting it out is powerful, because it is a fundamentally human act that helps you empathise with the role you play. Reflecting on how it feels is essential. It is also incredibly fun!

Concept tool

The concept canvas is a tool used to capture important details about a concept in a participatory manner. It is used in the Prototype stage to push the thinking of teams and force answers to questions that otherwise may not come out in the prototyping process. 

Check out the Advocacy Toolbox for Influence Tree (p. 11) and Opposition Matrix (p. 14)

Please wait while flipbook is loading. For more related info, FAQs and issues please refer to DearFlip WordPress Flipbook Plugin Help documentation.

Meet the mentors (15 mins) 

Image by artursafronovvvv on Freepik

You will have more time to work on this template in Chapter 6.
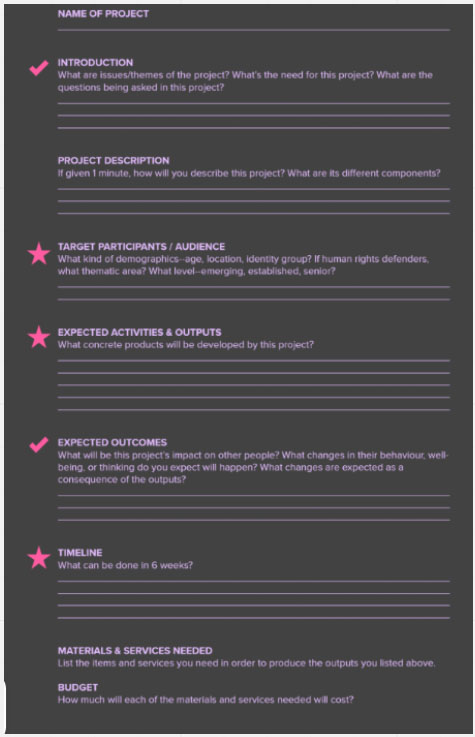
NAME OF YOUR IDEA 

INTRODUCTION 

What are issues/themes of the solution? What’s the need for this solution?   

IDEA DESCRIPTION 

If given 1 minute, how will you describe this idea? What are its different components?    

TARGET PARTICIPANTS / AUDIENCE 

What kind of demographics–age, location, identity group? If human rights defenders, what thematic area? What level–emerging, established, senior?  

EXPECTED ACTIVITIES & OUTPUTS 

What concrete products will be developed by this project?  

EXPECTED OUTCOMES 

What will be the impact on other people? What changes in their behaviour, well-being, or thinking do you expect will happen? What changes are expected as a consequence of the outputs? 

TIMELINE 

What can be done in 6 weeks?  

MATERIALS & SERVICES NEEDED 

List the items and services you need in order to produce the outputs you listed above.  

BUDGET 

How much will each of the materials and services needed will cost? 

2. Check progress (checklist + possibly visual progress, with upload) 

  • Checklist is the questions 

3. Templates and tools  (incl. links) 

1. How to? Step-by-step

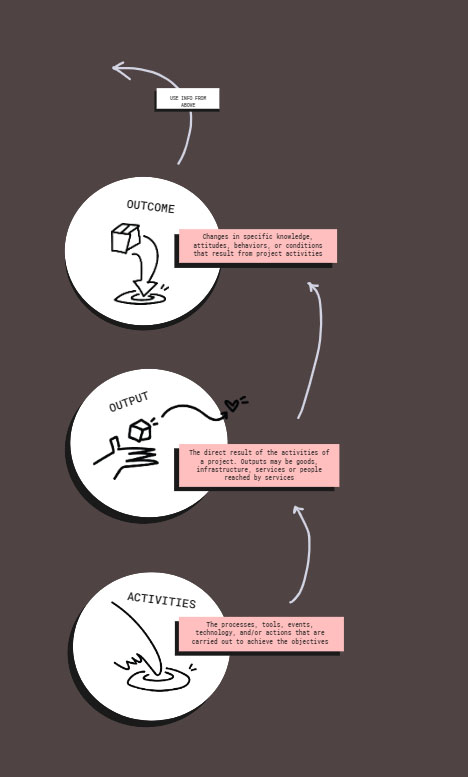
Based on the details of your previous step, take one separate sheet of paper (or corner of your online white board) and define the three elements of an extra short ToC (ToC stands for Theory of Change). The elements are: 

Outcomes of your idea: 

Changes in specific knowledge, attitudes, behaviors, or conditions that result from project activities 

Outouts of your idea: 

The direct result of the activities of a project. Outputs may be goods, infrastructure, services or people reached by services 

Activities: 

The processes, tools, events, technology, and/or actions that are carried out to achieve the objectives 


2. Check progress (checklist + possibly visual progress, with upload) 

  • Three elements checklis 


3. Templates and tools  (incl. links) 


4. Social Media

Share the extra short ToCs on social media to get traction and engage followers in the progress 

1. How to? Step-by-step

Flash feedback is a group activity for giving and receiving comments and constructive criticism. This is an important activity that enables you to receive feedback, which is incredibly valuable for quickly improving upon your ideas or pivoting in a new direction.  

  1. Decide which team members will stay to explain your prototype and record feedback, and which will be responsible for visiting and providing feedback on the other prototypes. At minimum, two team members should elect to stay – one to attentively listen to feedback, and one to record the feedback. 
  1. Those providing feedback should move to another team. Be sure the feedback providers are spread evenly among the other teams. 
  1. When everyone is in position, those who stayed behind should offer a short description of their team’s prototype (approximately 4 minutes). 
  1. After the explanations, visiting team members should take turns providing feedback and asking any questions they may have about the prototype (another 4 minutes or so). Meanwhile, those who stayed back should take in that feedback, with one person listening attentively and the other recording. 
  1. After the initial round of feedback, additional rounds of flash feedback may be repeated until the allotted time for this acclivity has expired. 6. After all flash feedback has been completed, visiting team members should return ‘home’ to review the feedback they received. Depending on the amount of feedback received, you may wish to jot each piece of feedback down on a sticky note and group and cluster similar feedback. Discuss these groupings so everyone has a clear understanding. 

OUTPUTS: The notes taken by the team members who stayed behind will act as an initial record of the feedback received. If sticky notes were created for each piece of feedback and then grouped, be sure to take a picture of the groupings when you are done.

2. Templates and tools  (incl. links) 

Extra tip: 

Make it clear that those receiving feedback should not respond except when asked a question directly, or to acknowledge and thank feedback providers. The natural instinct is to do the opposite, so be on guard! It is really hard to resist responding, but it becomes surprisingly easy with a little practice.